Friday, January 11, 2013

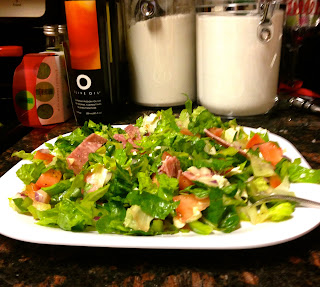
Quick Lunch: Italian Chopped Salad

New Year's Resolution #4 of 1,000,000. Eat out less and make healthier meals! I know this is always everyone's goal, but I am reallllllly going to try to stick to at least this one out of my bagillion resolutions. We can make excuse after excuse about how there is not enough time to make lunch, or I'll just heat up this frozen meal to save some time or to encourage our laziness. But fast food and even frozen foods are just so TERRIBLE for you. Don't get me wrong I love some McDonald's chicken nuggets every now and then, but one happy meal (you know those things for kids) is 17 weight watcher points. 17!!!!!!! That's 2/3 of my daily allotment. Just start doing a little bit of research, and you can see how much garbage goes into these products. Just knowing that will instantly help you make better choices!

We need to stop making excuses for ourselves and really put in the effort. If you plan your meals on sunday, when there is rarely going anything on anyway you can even make a ton of it ahead of time and be ready to go for the whole week.

This was a pintrest recipe I found, and it was a wonderful wonderful salad! It's 11 WW points per serving, but it's all good points! You could substitute meats or cheeses to minimize those points if you really wanted to. Just in general don't be afraid to play with recipes. I'm definitely guilty of looking at a recipe and saying "Yeah. No thanks!" That's silly. You can almost always substitute ingredients or play with the amounts to get a taste that suits you. In this particular recipe I played with the dressing. I wanted to tone down the red wine vinegar flavor. I added a little more garlic, salt, and pepper until it tasted right for me. You could also just pour in less red wine vinegar (but I didn't know that until it was already made).

One more challenge: FRESH IS BEST!!! Don't be afraid to use fresh vegetables because they go bad, or are more expensive. You can plan your menu around similar ingredients for the week. But either way it's worth it to eat fresh. It's better for you and it tastes better too!

This recipe also makes a ton, so just don't toss it in the dressing and you can have it a couple days in a row. Trust me you won't get tired of it. You'll want it all week!


Italian Chopped Salad
4 Romaine Hearts Diced
2 Roma Tomatoes, Seeded and Diced
1 Green Bell Pepper, Seeded and Diced
1/2 Red Onion, Diced
1/3 C. Kalamata Olives, Pitted and Diced
8 Oz. Fresh Mozzarella
4 Oz. Italian Dry Salami, Chopped
1 Tbs. Fresh Basil
1 Tbs. Fresh Parsley

Herbed Red Wine Vinaigrette
1/4 C. + 2 Tbs. Red Wine Vinegar
2 Garlic Cloves Pressed
1/4 tsp. Dijon Mustard
1/2 tsp. Salt
1/2 tsp. Italian Seasoning
Pinch of Ground Pepper
3/4 tsp. Sugar
1/4 C. + 2 Tbs. Olive Oil

Step 1: To make the salad Just combine all the ingredients!

Step 2: In a separate bowl add all ingredients through sugar and whisk to combine. Slowly add the oil whisking constantly, until combined. (Really give this a little bit of time so the flavors bend well) 

Step 3: Adjust the flavors as needed. (I topped the salad with fresh black pepper and it was amazing)

HOW EASY WAS THAT!!!! Enjoy!

Friday, January 4, 2013

Sinfully Addicting Red Velvet Brownies

I want to write about how just how amazing these brownies are, but the words cannot do these little guys justice. It's definitely the most requested recipe by friends and family, and they have been huge hits when i've given them as gifts. With Valentines day right around the corner, this could be a good recipe to perfect!

I will give fair warning about experimenting with the recipe though. I tried to double a batch and it was a failure. I haven't decided if it's because the ingredients don't work well doubled or if it just made them two thick. I used the same size pan as a single batch, so perhaps if I had switched to a rectangle they would have cooked more evenly. That being said, if any of you try to alter the recipe and succeed (or fail ;) ) please let me know!

Another helpful tip about this recipe is in the parchment paper. I HATE trying to get parchment paper to stay or to keep it's shape when pouring in batter. To do so is an art form...one i am still trying to perfect. But  I have found it helpful to fold the sides to help it keep its shape, and just tape it to the outer edge of the pan until you pour in the batter (just don't forget to remove the tape!) It really does make a huge difference.

But without further ado.......drum roll please!!!!

***I forgot to take a picture when they were done!!!! WHOOPS!

Red Velvet Brownies

1/2 C. of room temperature butter
1 1/2 C. Sugar
2 Eggs
2 tsp. Vanilla
1 1/4 C. Flour
1/4 tsp. salt
3 Tbs. Cocoa Powder
2 Tbs. Red Food Coloring

White Chocolate Icing (optional...but necessary)

1/2 C. Room Temperature Butter
2 1/2 C. Powdered Sugar
1 tsp. Vanilla
4 Oz. White Chocolate
1-2 Tbs. milk

Step 1: Preheat the oven to 350 degrees, and either line a baking pan with parchment paper or grease and flour it. (**If bringing to a party I recommend the parchment paper it makes it easier to cut clean squares)

Step 2: In a small bowl mix the cocoa powder, food coloring, and 1 tsp. of vanilla to form a paste like mixture. 

Step 3: In a larger bowl cream the butter and sugar until light and fluffy!!! (**"IT'S SO FLUFFFFYYYYYYY" - I love Despicable Me, what a great movie!) Add the eggs one at at time and then the rest of the vanilla. Beat in your paste mixture, and then SLOWLY add the flour and salt.

Step 4: Pour into your prepared pan and bake for 25-30 minutes. DO NOT ICE THEM UNTIL COMPLETELY COOLED!!!!

Step 5: Melt the white chocolate (**You can find instructions on the package or ask me!) then set it aside. Then cream the butter and sugar until light and fluffy again. add the vanilla, and then slowly start adding the powdered sugar. When mixed in add the white chocolate. Finally add just tiny bits of milk a time until you reach the desired consistency. (**If you over do it just add more powdered sugar) Then you can ice them and eat up!

If you gain 20 pounds because you can't stop eating this...don't blame me! I tried to warn you

Monday, December 31, 2012

Eggnog Fudge

Need a way to use up any leftover eggnog? Try this fudge it's relatively easy and tastes amazing. Even though a fudge recipe is short and doesn't take much time it still can be a little bit of an art form. Before starting this recipe make sure you have a candy thermometer!!!!! One of the steps requires you to boil some of the ingredients, and they MUST reach a certain temperature or it will never give you the right consistency; leaving you with a gooey mess.

I quadrupled my recipe for the holidays and it made far too much. If you make it for a party I would suggest making a batch and a half, but pouring it into the same pan so you get thicker squares of fudge. A single batch is plenty though!!!

Fair warning this stuff is incredibly addicting.


Eggnog Fudge Recipe

2 C. sugar
1/2 C. salted butter
3/4 C. Eggnog
10.5 Oz. White Chocolate bars - chopped
**(Note: I just use a bag of white chocolate chips)
1/2 tsp. Nutmeg + a little extra to sprinkle on top
7 Oz. jar of Marshmallow creme
1 tsp. Rum or Rum extract

Step 1: Line a pan (you can use square or rectangle - if you double it use a rectangle or 2 squares!) with aluminum foil and lightly butter it.

Step 2: In a large sauce pan boil the sugar butter and eggnog until a candy thermometer reads 234 degrees. This will take about 10 minutes, and make sure you are stirring constantly. Take it off the heat.

Step 3: Use a wooden spoon, and QUICKLY add the white chocolate and stir until smooth. Then add the nutmeg, marshmallow creme and rum. When well blended you can pour it in the pan and sprinkle some nutmeg on top to make it pretty!

Step 4: Let it cool at room temperature or put it in the refrigerator until hard. (**I recommend the refrigerator if you have the extra space, it is SIGNIFICANTLY faster)

Step 5: Cut into squares and enjoy!

Wednesday, February 1, 2012

Valentine's Flower Bouquet

Who needs a boy to give them flowers????? ok ok, every girl wants flowers! But there is nothing in the rule book that says we can't buy them for ourselves every now and then. Flowers can be expensive, so if you are spending Valentine's Day by yourself or if you just want to decorate for the holiday treat yourself to some very beautiful very delicious smelling pink roses or gerber daisies or whatever suits your fancy!

I have to admit I got this idea off pintrest...That website is so great, but it has been KILLING my productivity. At least I know every other girl is spending just as much time on it as I am. This particular project actually turned out a lot better than I thought it would. You just have to mess with it a little bit until you get everything where you want it.

I used a vase that already had a center spot for a candle. I think that's easiest, but I made another one where I just put a plastic cup in the center I could fill with water. The first thing I put in the vase were the candy hearts. You don't have to necessarily use those, I had wanted to use pink and red jelly beans, but I couldn't find a place to just get the individual colors. I was SHOCKED target didn't have a bag of them.

The second layer is just heart peeps. These were kind of tricky. I pulled some of them apart, and I would NOT recommend that. Use a knife so you get a clean cut with less white showing, OR use a round case so you never have to break them apart and you can just curve them along the edge. They are kind of tricky and don't like to stay. I crumpled up some pink toulle and stuck it behind the hearts to help keep them in place. (Lucky for me that toulle came wrapped around my flowers!)

Then I cut the roses pretty short so they would sit low in their holder. When you cut the flowers be sure to cut them at an angle, I'm not sure what exactly that does but my flowers stay fresher much longer. Someone asked me how I change the water for the flowers...haha this might sound ridiculous, but I use a turkey baster! I suck up the water, and then put clean water in! Works like a charm, and I don't ruin the candy :)

If you try this be sure to send me a picture of how it turns out, I'd love to see what candies everyone uses!!!

Champagne Marshmallows

When you think of Valentine's Day, what comes to your mind? Roses, Candy, Love, Hearts.......Champagne! Every thing you hear about Valentine's Day includes Champagne. Want to stay in our love suite for a night? Enjoy a complimentary bottle of Champagne. Don't bother going out to eat that night it can be depressing to watch all of the couples sitting there smiling over their glasses of....you guessed it Champagne.

But this year we are not worried about being a couple, we are worried about loving ourselves and everyone else worth while in our lives. Soooooo why not enjoy some Champagne ourselves? Almost everyone enjoys a glass of it every now and then. Today though we are going to do more than just drink Champagne we are going to eat it! In a big, white, fluffy kind of way. These little marshmallows are surprisingly delicious and taste great on a s'more.

Champagne Marshmallows

1 1/2 oz. gelatin (I use the knox brand)
27 oz. champagne (separated)
11 oz. corn syrup
28 oz. sugar
1/2 tsp. salt
optional: seeds from 1 vanilla bean 
Plenty of Powdered Sugar!!

Step 1:
     Lightly grease a 9" x 13" 

Step 2:
     Combine the gelatin and 11 ounces of the Champagne together in a bowl you can use a mixer with. Set it aside


Step 3: 
     Pour 16 oz. of Champagne into a medium pot over medium-low heat. Simmer the champagne for about 15 minutes or until the mixture is reduced by half. You are trying to get to right around 8 oz. If you think it's gone too far, just add a little more Champagne.


Step 4:
     In the same pot add corn syrup, sugar, salt, and vanilla bean scrapings (if using) to the champagne. Turn the heat up to medium and stir. Try not to push the liquid up the sides of the pot. Leave it on the heat undisturbed until mixture registers 240 degrees on a candy thermometer. Once you reach that temperature take the pot off the heat and let it cool to 210 degrees. (DON'T BE LAZY OR GENEROUS WITH THE TEMPERATURES!)


Step 5:
     When cooled, pour the mixture into the mixing bowl with the gelatin. Using your mixer, whip the mix on medium speed for about a minute or until gelatin has fully melted. 

Step 6:
     Turn your mixture on high and whip until mixture has tripled in volume...(this takes some time, so don't get discouraged - I thought I was doing it wrong, and my mom and i fuddled with it then all of a sudden it got huge!) Pour this goo into the pan and bang it against the counter to level the mixture. 


Step 7:
      Dust the top of the giant marshmallow with some powdered sugar, cover, and refrigerate at least 4 hours (preferably overnight)

Step 8:
     To cut the marshmallows....dust a cutting board with powdered sugar. Take the marshmallow out of the pan....all of it...literally pull the entire thing out by digging your fingers under a side. Using a chef's knife, cut it into strips and then cubes of any size you life. Or use cookie cutters to get shapes. 


Step 9:
    Roll each piece in powdered sugar so it isn't sticky and enjoy!


**Note: store them in an air tight container or a zip lock bag. 

   There is a lot you could do with these. You can dye them, use cookie cutters, give them as gifts, put them in ice cream, roast them. They are very versatile and very yummy. I hope they spice up your Valentine's Day! Everyone else will be drinking their glass of Champagne only to be enjoyed for a few minutes one night. You'll get to have your Champagne and continue to enjoy it for weeks!