Showing posts with label Appetizer. Show all posts

Friday, March 7, 2014

Irish Oatmeal Bread


So I've told y'all i'm really on this bread kick...I can verify that with the 6 loaves I just ate at Spaghetti Warehouse.  So with that combined with St. Patrick's day and a weekend it's the perfect time for you to try this Irish Oatmeal Bread.

When it comes to everyday bread I'm pretty picky. For example I hate wheat bread....back in the day I hate to admit that I would dread going to my Aunt's house near lunch time because she ONLY had wheat bread. Disgusting...I wish I had done what she said though because now I am a bread addict and I like the ones that are the most worst for you. Mostly, I liked my all american Mrs. Bairds white bread plain and simple. OR sourdough, gotta love that.

But now that I'm a wee bit older and I understand that I can't eat bread all of the time and I should try to branch out to at least the slightly better for you multigrain breads I've faced a moral dilemma: Find new breads or quit eating bread regularly. that's such a silly question I could never give up bread. My whole immediate family should be considered grainavours. When we go to restaurants its disgusting how much bread we eat.

Anyway, this dilemma pushed me to find better for you recipes and I love this one I found from Cooking Light via MyRecipes.com (credit also to pintrest). This meets me half way. It uses half white bread, half wheat bread, and also uses oats. It's a better for you bread without giving up white bread entirely. This recipe is GREAT for every day bread and it works well as toast too.

Words of warning: Bread without a bread machine can be a little tricky and you need to be patient. If you are having problems please feel free to contact me or leave a message in the comments so I can help you figure it out!
  
Irish Oatmeal Bread
    
          Ingredients: 
  •   2 1/4 C. Boiling Water
  •   1 3/4 C. Quaker Oats
  •   1 Tbsp. Salt
  •   3 Tbsp. Butter
  •   3 Tbsp. Light Brown Sugar, Packed
  •   2 Packages of active dry yeast
  •   1/2 C. lukewarm water
  •   3 1/4 C. All-Purpose Flour, Divided
  •   3 C. Whole Wheat Flour
  •   1 Large Egg, gently beaten


Step 1: Combine the boiling water, oats, salt, butter and light brown sugar in a large bowl. Set aside for about 25 minutes.

Step 2: Towards the end of that time dissolve the yeast in warm water and let stand until it's foamy. (Pour the packets into the water and use a fork to gently whisk it. a couple of minutes later whisk again and you should be good to go). Add the yeast to the oats mixture.

Step 3: Slowly begin adding 2 3/4 C. of the white flour and the 3 cups of the wheat flour to the mixture, stirring as you add each cup. (Once it becomes dough like I find it's easiest to begin gently kneading with your hands.)

Step 4: Bring the dough onto a lightly floured flat surface and continue kneading the bread until it is smooth and stretchy. (Be patient this part can take some time). Keep adding the rest of your white flour a tiny bit at a time. You may not need it all, so stop once your dough is no longer sticky. Put the dough back into the bowl, cover and let rise in a warm location for about an hour. (during this time the dough should grow in size).

Step 5: Use your fingers to "deflate" the dough and let it sit for a couple of minutes. Then divide your dough in half and shape the dough as you please. You can put it in loaf pans, or cook them on baking sheets as I did. As you work with the dough and knead it into your desired shape try to eliminate airpockets and ensure the dough is "sealed" all the way around.

Step 6: Again let your dough rise. This time for about 30 minutes. Preheat oven to 350 degrees during this time.

Step 7: Brush your beaten egg over the tops of your loaves, and bake for 50 minutes or until the loaves are browned and "sound hollow when tapped".


And your done!  It's a little time consuming, but I promise it's worth it and you can do it while watching TV on a Sunday afternoon.

Happy Eating!

Tanner

Tuesday, February 4, 2014

Cinnamon Sugar Bread


I'm not sure if I have talked about my obsession with bread. I haven't had the opportunity to cook a lot lately because I've been so busy, which is a HUGE BUMMER! That being said I am constantly looking for bread recipes.

I will be the first to say that I love Mrs. Bairds and Sara Lee, but there is something about cooking bread from scratch. The satisfaction that you made that, even after all the frustrating kneading or dough not rising right. And most importantly the smells! I remember my mom making them in her bread machine when I was little. It was always a real treat to get the homemade bread the really really good stuff. 

Unfortunately we no longer have a bread machine so I have had to find other, at times more difficult, ways to make breads. Over the next weeks as I post these bread recipes I will do my best to simplify and to let you know which ones are best when starting out. 

Bread is challenging especially if you've never seen it done before. You don't know what to expect, you don't know if the dough has risen enough..all are valid fears but you don't have to be so critical. It works a lot easier than you think! So...

 DON'T FEAR THE BREAD! BE THE BREAD!

This particular recipe I found on Averie Cooks. I really, really like it. And it wasn't too difficult...mostly because it doesn't use yeast. (so not a true bread) but that's ok. What matters is that it is scrumdiddilyumptious and you are going to LOVE it.

         Cinnamon Sugar Bread


                         1/3 C. Granulated Sugar
                         1 Tbsp. Cinnamon
                         1/4 C. Unsalted Butter, melted
                         1 Large Egg
                         1 C. Light Brown Sugar, packed
                         1/4 C. Vegetable Oil
                         1 Tbsp. Vanilla Extract
                         1 C. Buttermilk
                         2 C. All-purpose Flour
                         1 tsp. Ground Nutmeg
                         3/4 tsp. Baking Soda
                         pinch of salt


Step 1: Preheat your oven to 350. Melt a tablespoon or two of butter and use a paper towel to rub the sides of the pan and coat lightly with flour. 

Step 2: Mix the Sugar and cinnamon together in a small bowl. You'll use this later.

Step 3: Melt 1/4 c. of butter in the microwave and cool slightly. In a large bowl combine the butter, egg, brown sugar, oil, and vanilla. Then whisk in the buttermilk.

Step 4: Add the flour, nutmeg, baking soda, and salt. Stop stirring once everything is combined. (the batter may not be smooth and that's ok). 

Step 5: Pour half of the batter into prepared pan(s). Gently pound the tray on the counter to smooth the batter. Pour some of the cinnamon sugar over over this to create a cinnamon ribbon in the bread. Then pour the remaining batter on top. Again gently pound the tray on the counter to smooth.

Step 6: Sprinkle the remaining cinnamon sugar on top! It will help the crust become crunchy. Stick it in the oven and bake! Averie Cooks recommends 45-55 minutes, I started checking on mine at 35 minutes and when it was no longer jiggly in the center stuck a tooth pick in. If it comes out clean you're done!

It's really really really good! I hope you enjoy eating it and that it's not too hard for you to make. If you like the recipe I hope you keep reading my blog for more, but also be sure to check out Averie Cooks to see more of her great recipes.

check back this weekend for some yummy Valentine's treats!

Happy Eating,

Tanner

Wednesday, January 30, 2013

A Soup Every Man will Appreciate: Cheddar Ale Soup

Unless they are sick there is nothing harder then getting a guy to eat soup for an easy weeknight meal. Unless it's La Madeleine Tomato Basil...I don't know what it is about that soup that EVERYONE loves! Still, sometimes it's just to hard to come home and make a full meal every night. Soup (plus or minus a grilled cheese on the side) is an easy fix for that and a healthier alternative to a frozen dinner. Plus most of them take minimal effort. Unfortunately, for those of you with spouses or significant others eating soup somehow makes them less manly.

This recipe though was found AND COOKED!!!! by one of my guy friends Braden. He suggested this soup with potato nachos (a recipe for another time) one night to watch the playoff games. I have to admit when he told me it was a Cheddar Jalapeno Ale soup I was a little suspicious (rightfully so I think), but I was pleasantly surprised with how good it was! Beware that it definitely has a kick too it. It's a great fall/winter soup because it's a little thicker and heartier than say a chicken noodle.

Don't knock it till you try it because it was truly very good. Now that could change depending on what beer you use. Braden used the Alaskan Amber. If you want one that will for sure taste good I'd go for that. Stay away from anything too light or fruity. I wouldn't be surprised if Shiner went really well with this recipe. Be sure to comment if you try a certain beer you like!

You could also pair it with a beer bread or a sourdough to dip in the soup! Without further ado here is the recipe. Good luck!

<3 Tanner
Cheddar Jalapeno Ale Soup
1/2 Lb. bacon, 1" slices
2 stalks celery, diced
2+ JalapeƱo peppers, diced (**we used 3)
2 cloves garlic, chopped
2 Tbs. butter
1/4 C. flour
12 oz. Ale
2 C. Chicken Broth
1/2 C. Heavy Cream
1 tsp. dijon mustard
1 Tbs. Worcestershire
2 C. Cheddar Cheese, shredded
Cayenne to taste
Salt & Pepper to Taste

Step 1: After slicing the bacon go ahead and cook it IN the pot you are going to make the soup in. When done scoop it out onto paper towels. Drain the pot, but reserve 2 Tbs. of the grease and keep it in the pot.


Step 2: Add celery and jalapeƱos and cook until they have softened and are fragrant. Then add the garlic and thyme and stir for a minute or two.


Step 3: Add the butter and stir till it melts. Slowly add the flower stirring constantly so it doesn't stick to the bottom.


Step 4: Add your beer of choice along with the chicken broth. While stirring be sure to wipe down the sides of the pan with your spoon so nothing is sticking. Add the bacon and cook for about 10 minutes. 


Step 5: Add your heavy cream, worcestershire and cheese. Cook until all the cheese is melted, but be sure that the soup doesn't reach it's boiling point!!


Step 6: Flavor as needed with the salt, pepper, and cayenne and serve it up! 


Enjoy!!!

Friday, January 11, 2013

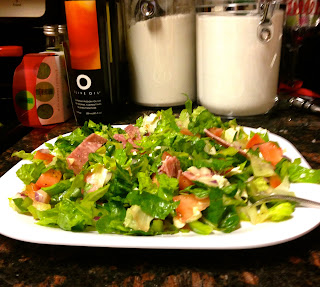
Quick Lunch: Italian Chopped Salad

New Year's Resolution #4 of 1,000,000. Eat out less and make healthier meals! I know this is always everyone's goal, but I am reallllllly going to try to stick to at least this one out of my bagillion resolutions. We can make excuse after excuse about how there is not enough time to make lunch, or I'll just heat up this frozen meal to save some time or to encourage our laziness. But fast food and even frozen foods are just so TERRIBLE for you. Don't get me wrong I love some McDonald's chicken nuggets every now and then, but one happy meal (you know those things for kids) is 17 weight watcher points. 17!!!!!!! That's 2/3 of my daily allotment. Just start doing a little bit of research, and you can see how much garbage goes into these products. Just knowing that will instantly help you make better choices!

We need to stop making excuses for ourselves and really put in the effort. If you plan your meals on sunday, when there is rarely going anything on anyway you can even make a ton of it ahead of time and be ready to go for the whole week.

This was a pintrest recipe I found, and it was a wonderful wonderful salad! It's 11 WW points per serving, but it's all good points! You could substitute meats or cheeses to minimize those points if you really wanted to. Just in general don't be afraid to play with recipes. I'm definitely guilty of looking at a recipe and saying "Yeah. No thanks!" That's silly. You can almost always substitute ingredients or play with the amounts to get a taste that suits you. In this particular recipe I played with the dressing. I wanted to tone down the red wine vinegar flavor. I added a little more garlic, salt, and pepper until it tasted right for me. You could also just pour in less red wine vinegar (but I didn't know that until it was already made).

One more challenge: FRESH IS BEST!!! Don't be afraid to use fresh vegetables because they go bad, or are more expensive. You can plan your menu around similar ingredients for the week. But either way it's worth it to eat fresh. It's better for you and it tastes better too!

This recipe also makes a ton, so just don't toss it in the dressing and you can have it a couple days in a row. Trust me you won't get tired of it. You'll want it all week!


Italian Chopped Salad
4 Romaine Hearts Diced
2 Roma Tomatoes, Seeded and Diced
1 Green Bell Pepper, Seeded and Diced
1/2 Red Onion, Diced
1/3 C. Kalamata Olives, Pitted and Diced
8 Oz. Fresh Mozzarella
4 Oz. Italian Dry Salami, Chopped
1 Tbs. Fresh Basil
1 Tbs. Fresh Parsley

Herbed Red Wine Vinaigrette
1/4 C. + 2 Tbs. Red Wine Vinegar
2 Garlic Cloves Pressed
1/4 tsp. Dijon Mustard
1/2 tsp. Salt
1/2 tsp. Italian Seasoning
Pinch of Ground Pepper
3/4 tsp. Sugar
1/4 C. + 2 Tbs. Olive Oil

Step 1: To make the salad Just combine all the ingredients!

Step 2: In a separate bowl add all ingredients through sugar and whisk to combine. Slowly add the oil whisking constantly, until combined. (Really give this a little bit of time so the flavors bend well) 

Step 3: Adjust the flavors as needed. (I topped the salad with fresh black pepper and it was amazing)

HOW EASY WAS THAT!!!! Enjoy!

Sunday, December 11, 2011

An Appetizer to Bring to All your Holiday Parties

Tis' the season...to never know what to bring with you to all of those holiday parties! But whether you are hosting the party or just want to bring a little appetizer this dish is super easy to make and will be a huge hit. I promise!

Cranberries are a very popular food in the winter both to eat and decorate with, but when I think of a "snack" my mind never goes "ooohhh Cranberries sound yummy", but lately I've been trying to use them whenever I can. They are gorgeous to look at and very tasty. You can also do a ton of stuff with them......things you may not have ever thought to pair with cranberries. This particular recipe is a Cranberry Salsa, and I hope you like it! 

Fair warning...I made it the night before Thanksgiving and let it sit over night. This ended up being good on many levels. The biggest reason being that I got jalapeno in my nails and then of course I rubbed my lips with said fingers/nails and both burned for AN HOUR AND A HALF! I couldn't make it stop. Burt's bees helped ever so slightly, but that would have been an awful Thanksgiving lunch had I still been burning! So be careful as you chop up and de seed the jalapeno...if you do get some on your hands keep them away from your face!

Cranberry Salsa

1  12 oz package fresh cranberries
1/4 C green onion, chopped
1/4 C cilantro, chopped
1 small jalapeno pepper
1 1/4 C sugar
1/4 t cumin
2 T lemon juice
dash salt
2  8 oz packages cream cheese

Steps!!!

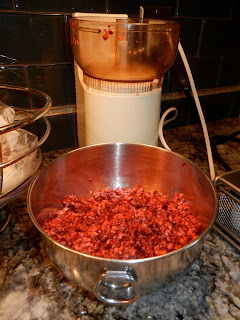
Step 1: Put the cranberries in a food processor. You want to chop them up so just twist the top on and off in a pulsing motion until the cranberries are as fine as you want them. You can also chop them up if you want, but it's going to be a lot more work for you. 

Step 2: Chop up the green onion, cilantro, and jalapeno into small peppers. Make sure on the green onions to use the white portion because that's where most of the flavor is. You can use the green too though! For this step I left out the cilantro because my mom doesn't like it (and I may have forgotten it at the store...oops!), but it turned out just fine without it. Cilantro is a strong flavor, and isn't for everyone. That being said I think my mom is an exaggerator because depending on the dip you can't even taste it.

Step 3: Add all of the ingredients (except the cream cheese) in a bowl. Mix it all together and cover/store in the fridge for at least 4 hours. It helps the sugar soak up and causes the cranberries tart flavor to fade just enough. 

Step 4: Right before you are ready to serve. Put the cream cheese on your serving plate (you may want to let it soften just a little before spreading it) and spread the cream cheese in about a quarter of an inch to half inch layer across the plate. I would leave some room on the edges so if the cranberries spill over the edge it doesn't go off the plate. 


Step 5: Pour cranberry sauce over the cream cheese and spread it all around! And you're done! Hooray!!!!!!


This will seriously be gone in 5 minutes, so if you have a big family you might consider making a double batch. Or two separate batches, that way if no one eats it you can save the other for yourself! I served it with these pita type chips, but you could use wheat thins, slices of garlic toast, or pretty much whatever you want or what type of chip your family prefers. I would stick to a relatively bland flavored chip or cracker though because the salsa has so much flavor and you don't want to take away from it. 

You could serve this at a holiday meal, bring it to a holiday party, or serve it to guests at YOUR next holiday party. Merry Christmas! And Happy Dipping!