Sunday, December 18, 2011

Christmas Morning Cinnamon Rolls

Who doesn't love Cinnamon Rolls?

Fair warning! If you want to do this you have to start them on christmas eve, and give yourself a little bit of time in the morning. But they are SO worth it! They have been really popular with my friends, and aside from the time letting things rise they aren't too too difficult.

They will make your house smell delicious, and make everyone in your family both big and small so happy. If it doesn't....you can blame me! I did make some notes (they are in purple) of specific things that have worked for me when using this recipe

Overnight Cinnamon Rolls

For the Dough:
1 Tbs. active dry yeast (one package)
1/2 c. warm water
4 1/2 c. all-purpose flour
4 large eggs
1/4 c. sugar
2 tsp. kosher salt
1/2 c. unsalted butter (at room temp.)

For Filling:
1/2 c. unsalted butter melted 
1/2 c. sugar mixed with 1 tbs. ground cinnamon 
***I would make a little extra of this

For the Icing:
1 c. confectioner's sugar
1/2 tsp. kosher salt
2 tbs. unsalted butter (melted)
2 Tbs. whole milk
1 tsp. pure vanilla extract

Instructions!

Step 1 - Making the Dough
     *Note: they use a stand mixer  with the dough hook, but I just use my hands or a spoon. It's just as easy and you get less messy. Anyway, sprinkle the yeast over the water and allow to bloom for a few minutes then whisk until smooth.

      Whisk in 1/2 c. of the flour. Cover with plastic wrap and let it stand in a warm spot about 30 minutes. (I always put it on top of the dryer and let it run)

       Add the eggs, sugar, salt and remaining flour to the mixture. Knead it on a medium speed until smooth, Again I just use my hands (put a little flour on your hands first it helps counteract the stickiness)

      Add the room temperature butter and continue to knead adding flour to reduce stickiness as needed. Do this until the dough is smooth again. **If you are using your hands make sure you really work in the butter so it doesn't get clumpy. 

      Cover with plastic wrap and let rise until doubled, about 2 hours. 

Step 2 - Making the Rolls

     Butter a 9 by 13 inch baking dish

      Roll out the dough into a huge rectangle (about 15 by 10 inches - if the dough keeps pulling backwards rest a damp towel on top of the dough for a couple of minutes and try again). 
   
      Brush half of the melted butter over the rectangle, but leave about a 1-2 inch strip butter free. 

     Sprinkle the sugar mixture over the butter (I'd press it into the dough just a little bit).

     Starting with the side that has butter to the edge...roll up the rectangle. The snugger the better!

     Cut your giant roll into 10 pieces and place them cut side up in the dish. 

     Brush with the remaining butter, cover with plastic wrap and let them rise in the refrigerator overnight.

Step 3 - Baking the Rolls

     The next morning, remove them and let them rise until half again as high (about an hour - but I am normally too anxious to wait this long and it's been ok)
  
      Preheat oven to 350 degrees and Bake until golden brown (about 30 minutes)

      Let cool and brush with the glaze

Step 4 - The Glaze

    In a small bowl sift together confectioner's sugar and salt

    In a different bowl whisk together butter, milk, and vanilla.

    Stir into the sugar to form a smooth paste and spread over rolls


THEY ARE SOOOOOOOOO YUMMY!!!!!!

Elf Letters!!!!!!

Imagine yourself back as a little kid and how badly you wanted your heros to write you a letter? Or at least receive a response to yours...Now imagine actually getting one!!! The happiness would be overwhelming. Even if you were quickly distracted by bigger better things as most kids are.

A couple of years ago I started writing letters to my younger cousins from "Bernard the elf." I'm not really sure where the idea came from but the name Bernard totally came from the Santa Claus, which has recently posed a problem, but I'll talk about that in a minute. Bernard writes to the kids every year in early december telling them stories of the North Pole reminding them to be good and some tid bits about himself and Santa. I probably have more fun coming up with the stories than the kids do reading the letters. But there is nothing I love more than watching their animated faces as they tell me the latest story from Bernard or them pointing out similarities with the North Pole in everyone's favorite Christmas movies.

Here are some examples of ones i've written....


The older of the cousins finally put two and two together that Bernard might be the same Bernard from the "Santa Claus" movie with Tim Allen. I can't decide if I really want them to think that or not because I don't want them to think movies aren't real and thus Bernard isn't real. I don't know my aunt just stared at them wide eyed haha they can come to their own conclusions. 

With the letter writing we have come across a few issues though. First of all, think through what you are sending!!! This year I sent an application to a reindeer completely ignoring the fact that if they responded I would have to REJECT them!!! Clearly I can't let them be reindeer, when they can't actually go to the North Pole. I rectified this situation, by naming her an official Representative of the North Pole instead. It seemed to be at least a semi-acceptable alternative. But don't worry Santa was plenty impressed with her application, that's why he offered her the "better" job.

Another issue this year was that 3 children got letters but one never made it. They explained to him that the boy letters were mailed separately from the girl letters. Haha again this seemed to work ok, but i'd try to make sure they get there altogether! I made up another story about messenger penguins and a norwhale eating the mail...if you want to know the story you'll have to ask. :)

Anyway, I think the elf letter writing is such a fun way to get involved with younger relatives or even a fun thing to do with your own children. 

Sunday, December 11, 2011

Perfect Little Gift or Snack idea for the Holidays!

This is so easy it doesn't even need a recipe! (Well it kind of does, but you can find it on a box of rice krispies.) I wanted to give a little something to my friends for the holidays, but I'm fortunate to have a lot of friends! That can get a little pricey giving them all gifts. So I needed to come up with something that could be done pretty easily, relatively cheaply, but made with lost of love. Thanks to pintrest I found the perfect idea.


I just made 2 batches of rice krispie treats. Right before I poured in the cereal I died the marshmallow mixture red in one batch and green in the other. I finished making the treats and then let them cool. The cooling part is ESSENTIAL! You will never be able to get them to mold if you try to do it while they are still warm. So take them out of the pot set them on parchment paper, and let them cool off for a few minutes.

After they cooled I rolled them into balls and put a rollo on top to make it look like a little ornament! The goal was to give each friend a red and a green one, but I ended up not having enough :(. That's ok! I put them in little baggies and tied them up with red and green ribbon and Wah la! (I don't really know how to spell that, but you get my gist). They were tasty, and it seemed like everyone appreciated it. Sometimes it's not the size of the gift, but just that you thought to make something. I know that sounds cliche, but everyone likes to get gifts even if it's just a little something. The fact that you took the time to MAKE it just makes it even better!


Happy Baking!

An Appetizer to Bring to All your Holiday Parties

Tis' the season...to never know what to bring with you to all of those holiday parties! But whether you are hosting the party or just want to bring a little appetizer this dish is super easy to make and will be a huge hit. I promise!

Cranberries are a very popular food in the winter both to eat and decorate with, but when I think of a "snack" my mind never goes "ooohhh Cranberries sound yummy", but lately I've been trying to use them whenever I can. They are gorgeous to look at and very tasty. You can also do a ton of stuff with them......things you may not have ever thought to pair with cranberries. This particular recipe is a Cranberry Salsa, and I hope you like it! 

Fair warning...I made it the night before Thanksgiving and let it sit over night. This ended up being good on many levels. The biggest reason being that I got jalapeno in my nails and then of course I rubbed my lips with said fingers/nails and both burned for AN HOUR AND A HALF! I couldn't make it stop. Burt's bees helped ever so slightly, but that would have been an awful Thanksgiving lunch had I still been burning! So be careful as you chop up and de seed the jalapeno...if you do get some on your hands keep them away from your face!

Cranberry Salsa

1  12 oz package fresh cranberries
1/4 C green onion, chopped
1/4 C cilantro, chopped
1 small jalapeno pepper
1 1/4 C sugar
1/4 t cumin
2 T lemon juice
dash salt
2  8 oz packages cream cheese

Steps!!!

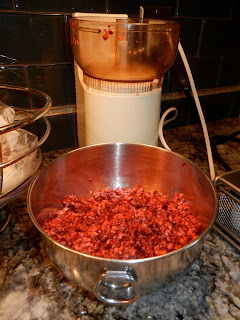
Step 1: Put the cranberries in a food processor. You want to chop them up so just twist the top on and off in a pulsing motion until the cranberries are as fine as you want them. You can also chop them up if you want, but it's going to be a lot more work for you. 

Step 2: Chop up the green onion, cilantro, and jalapeno into small peppers. Make sure on the green onions to use the white portion because that's where most of the flavor is. You can use the green too though! For this step I left out the cilantro because my mom doesn't like it (and I may have forgotten it at the store...oops!), but it turned out just fine without it. Cilantro is a strong flavor, and isn't for everyone. That being said I think my mom is an exaggerator because depending on the dip you can't even taste it.

Step 3: Add all of the ingredients (except the cream cheese) in a bowl. Mix it all together and cover/store in the fridge for at least 4 hours. It helps the sugar soak up and causes the cranberries tart flavor to fade just enough. 

Step 4: Right before you are ready to serve. Put the cream cheese on your serving plate (you may want to let it soften just a little before spreading it) and spread the cream cheese in about a quarter of an inch to half inch layer across the plate. I would leave some room on the edges so if the cranberries spill over the edge it doesn't go off the plate. 


Step 5: Pour cranberry sauce over the cream cheese and spread it all around! And you're done! Hooray!!!!!!


This will seriously be gone in 5 minutes, so if you have a big family you might consider making a double batch. Or two separate batches, that way if no one eats it you can save the other for yourself! I served it with these pita type chips, but you could use wheat thins, slices of garlic toast, or pretty much whatever you want or what type of chip your family prefers. I would stick to a relatively bland flavored chip or cracker though because the salsa has so much flavor and you don't want to take away from it. 

You could serve this at a holiday meal, bring it to a holiday party, or serve it to guests at YOUR next holiday party. Merry Christmas! And Happy Dipping!